


Shopify for beginners is simpler than most people expect. You can build a working store in one day without writing code, and Shopify usually lets new users start with a short free trial and a low introductory price. If you sell in Pakistan, you will also set up cash on delivery and a local payment gateway, because Shopify Payments is not offered here.
This guide to Shopify for beginners in Pakistan follows the order of Shopify's own admin and adds the local settings most global tutorials skip: PKR pricing, local couriers, cash on delivery and fake order prevention.
Key takeaways
- Shopify gives new accounts a short free trial and often an introductory price, so check the current terms on Shopify's Pakistan pricing page before you sign up.
- Shopify Payments is not available in Pakistan, so most new stores start with cash on delivery plus a third-party gateway.
- Set your store currency to PKR before adding products, and place a test order before you go live.
Your store setup at a glance
Step
Task
Estimated time
1
Create your account and start the trial.
10 minutes
2
Learn the Shopify admin.
15 minutes
3
Set PKR currency and business details.
10 minutes
4
Choose a free theme and design the homepage.
1 to 2 hours
5
Add products and collections.
1 to 3 hours
6
Create trust pages and policies.
45 minutes
7
Set delivery rates and choose a courier.
30 minutes
8
Add payment methods.
30 minutes, plus gateway approval
9
Connect a custom domain.
20 minutes, plus DNS update time
10
Place a test order.
15 minutes
11
Choose a plan and go live.
10 minutes
Estimated times assume a simple store with about 10 products.
What Is Shopify, and Do You Need Any Tech Skills to Use It?
Shopify is a hosted ecommerce platform. For a monthly fee, you get a store builder, web hosting, and secure checkout and order management in one place. Every plan includes unlimited hosting and a free SSL certificate, so you never install software or manage a server (Shopify pricing).
No coding is needed. You build pages by moving sections in the theme editor, and Sidekick, Shopify's built-in AI assistant, can help with layouts and product text.
The software is rarely the hard part. Most of your time will go into choosing products, taking clear photos, and writing honest product pages.
When a Marketplace Is the Better First Step
A Shopify store does not bring shoppers by itself, while a marketplace like Daraz does but charges a commission. If you have no budget for promotion, compare both in our guide on how to start an online store in Pakistan first.
Before You Sign Up: A 30-Minute Prep Checklist
Have these ready before you start:
- What you will sell, plus 5 to 10 starting products
- Clear product photos on a plain background
- A selling price for each item, with delivery cost counted
- A store name with a free matching .com or .pk domain
- A business email and a WhatsApp number
- A bank account or mobile wallet to receive money
- A card that allows international online payments, because Shopify bills in US dollars
How Much Does It Cost to Launch in Pakistan?
Shopify bills its plans in US dollars, and prices vary by country, so check Shopify's Pakistan pricing page for the current Basic plan price on the day you sign up. At the time of writing, Shopify's Pakistan pages advertised a three day free trial followed by USD 1 a month for the first three months (Shopify Pakistan), and its main pricing page applies that offer to most plans (Shopify pricing). If the offer is still running when you sign up, Shopify's fee for those first months is about USD 3. Offers change, and this figure covers Shopify only. Your full launch budget also includes the business costs below.
Cost item
Typical cost
What to know
Free trial
USD 0
Three days at the time of writing
Introductory offer
USD 1 per month for 3 months
On most plans at the time of writing, offers change.
Basic plan afterward
Listed on the Pakistan pricing page
Billed in USD; yearly billing costs less per month.
Cash on delivery orders
No Shopify transaction fee
Manual payments are exempt.
Card and wallet orders
Gateway fee plus Shopify's third-party fee
Rates depend on your gateway and plan.
Custom domain
Yearly fee
Optional at launch; myshopify.com is free.
Paid apps and themes
Optional
Free versions are enough to start.
Packaging and courier charges
Per parcel
Get written quotes before launch.
Marketing
Your choice
Organic posts cost time; ads cost money.
Shopify confirms that manual payments such as COD carry no third-party transaction fee (Shopify Help Center), while orders through a third-party gateway do (Shopify Help Center).
Step 1: Create Your Account and Claim the Free Trial
- Go to Shopify.com and click Start for free.
- Enter your email, create a password, and answer the short setup questions.
- Choose a store name. Shopify gives you a free web address ending in myshopify.com.
Shopify's AI Store Builder can create three starting designs from a short description of your brand (Shopify). Use one as a first draft, then edit it.
Step 2: Find Your Way Around the Admin Dashboard
Spend 15 minutes exploring the Shopify admin before you build anything.
Menu
What you do there
Home
See setup tasks and today's sales.
Orders
Confirm, fulfill, and track orders.
Products
Add items, prices, and stock.
Online Store
Change your theme and store pages.
Settings
Payments, shipping, domains, and policies
Step 3: Set PKR Currency, Time Zone, and Business Details
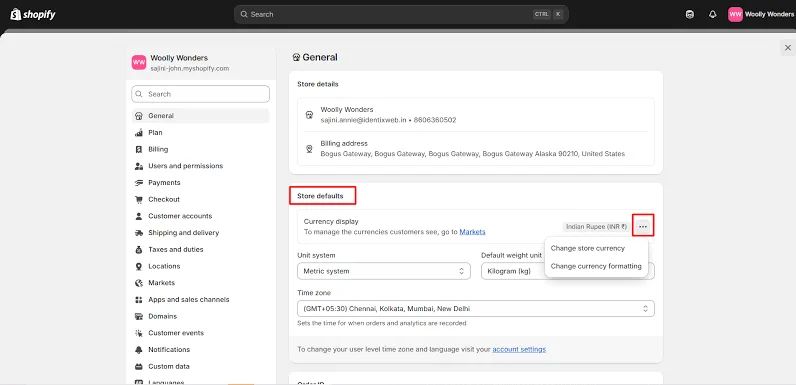
Do this before you add a single product. Go to Settings > General. In Store defaults, under Currency display, open the menu, choose Change store currency, and select Pakistani Rupee (PKR). Set the time zone to Karachi, add your store address and contact email, and click Save (Shopify Help Center).
Why first? Shopify does not automatically convert existing product prices when you change the store currency. The currency label changes, but the amounts stay the same, so every price would need to be checked and updated by hand (Shopify Help Center).
Changing the currency later, after you have started selling, has wider effects. According to Shopify:
- Shipping rates keep their old amounts and currency until you delete them and add them again.
- Discounts need to be reviewed and adjusted for the new currency.
- Reports can be affected by currency rate differences.
- Orders with pending payments can be affected, so Shopify asks you to resolve them first.
- Gift card balances in the old currency stop working.
Setting PKR on day one avoids all of this.
Step 4: Choose a Free Theme and Design Your Homepage
- Go to Online Store > Themes and browse the free themes in the Shopify Theme Store.
- Pick a layout that suits your product count, not only the colors.
- Click Customize, then add your logo, colors, and fonts.
- Add a banner, a featured collection, your delivery promise, and a WhatsApp contact.
- Check the mobile preview, where most buyers will shop.
Free or Paid Theme for a First Store?
Start free. Shopify's Horizon theme foundation includes 10 ready presets, drag-and-drop theme blocks, and built-in AI that creates a content block from a plain request such as "seasonal discount banner" (Shopify).
Step 5: Add Products, Photos, and Collections That Sell
Go to Products > Add product and fill every field:
- Title: the item plus one key detail, such as "Women's Lawn Suit, 3 Piece."
- Description: size, material, care, delivery time, and return rule in short lines.
- Media: four to six photos, with alt text that describes each image.
- Price: use compare at price only when an old price really existed.
- Inventory: add SKU and quantity so you never sell stock you do not have.
- Variants: sizes or colors.
- Collections: group items, such as "Summer Lawn" or "Under Rs 2,000," so visitors browse faster.
Write Descriptions Shoppers and AI Assistants Understand
Shopify's pricing page lists selling in AI chats as included in every plan, though Shopify notes that some features vary by country (Shopify pricing). Clear titles, real sizes, materials, and prices help those tools describe your items correctly, so write your own descriptions instead of pasting a supplier's.
Step 6: Create Trust Pages and Policies Customers Check First
Dawn reports that fear of fraud and inconsistent delivery hold Pakistani shoppers back at checkout (Dawn), so clear pages win orders.
- About Us: your real name, city, and a photo.
- Contact: WhatsApp number, email, and working hours.
- FAQ: delivery time, COD, and exchanges.
- Policies: go to Settings > Policies and set refund, privacy, shipping and terms of service. Shopify offers templates, but edit them to match your real rules.
Add these pages to your footer menu so every visitor can find them.
Step 7: Set Up Delivery Rates and Couriers Across Pakistan
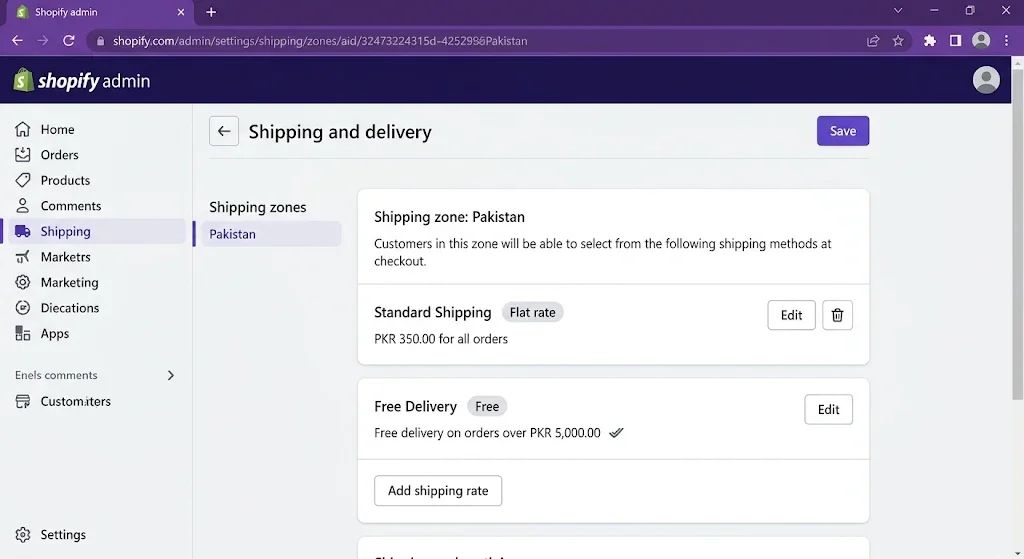
Go to Settings > Shipping and Delivery, create a Pakistan shipping zone, and add your rates (Shopify Help Center). A common setup is one flat delivery fee plus free delivery above a set order value.
Then choose a courier such as TCS, Leopards Courier, PostEx, Trax, M&P, BlueEX, or Call Courier, and compare them on these points:
What to compare
Why it matters
Rate per weight slab
Sets your delivery fee
COD remittance cycle
How fast collected cash reaches you
Return charges
Your cost when a buyer refuses a parcel
Rates change often and depend on parcel weight, destination city, and monthly volume. Ask two or three couriers for a written quote and their COD payment schedule, then set your delivery fee from those numbers.
Step 8: Accept Payments: Cash on Delivery, JazzCash, Easypaisa, and Cards
Pakistan is not on Shopify's list of countries supported by Shopify Payments (Shopify Help Center), so you will use manual methods and third-party gateways instead. Start with COD: in a Gallup & Gilani Pakistan survey, six out of ten online shoppers preferred cash on delivery (Dawn).
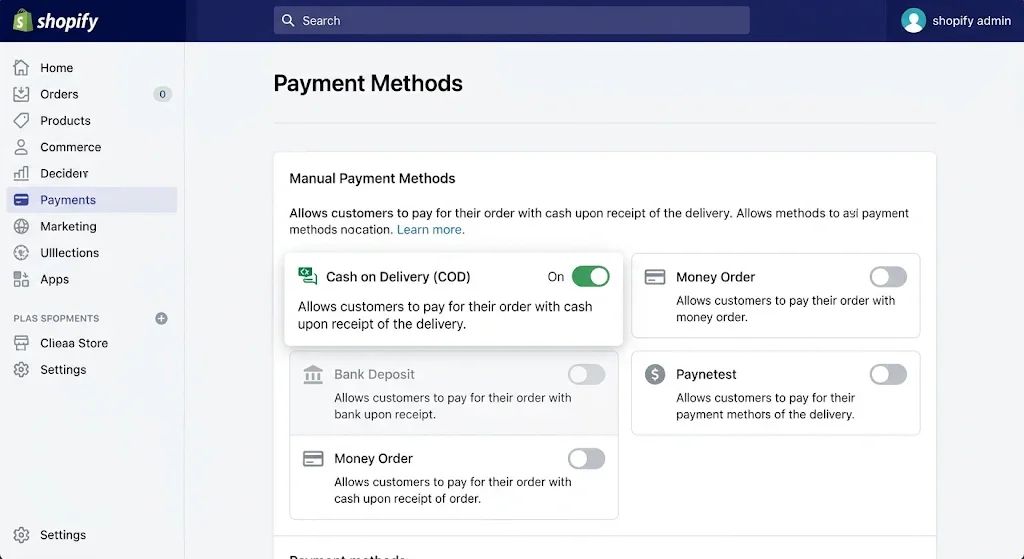
To turn on COD: go to Settings > Payments, choose Cash on Delivery (COD) from manual payment methods, add payment instructions, and click activate (Shopify Help Center).
For cards and wallets: filter Shopify's payment gateways page by Pakistan to see which providers are currently available, as Shopify recommends (Shopify Help Center). One example is the PayFast Gateway App, which accepts card, bank account, and digital wallet payments, with fees set per merchant. Apply early, and compare each gateway's fees, settlement time, and required documents before you choose.
Cut Fake COD Orders with a Confirmation Step
Confirm each COD order on WhatsApp or by phone before you book the courier. If a buyer does not reply, follow a simple rule of your own, for example, a second call the next day before you hold or cancel the order. A short confirmation step can save delivery and return charges on parcels nobody accepts.
Step 9: Connect a Custom Domain (.com or .pk)
Go to Settings > Domains to buy a domain through Shopify or connect one you own by updating its DNS records. Register a .pk address with PKNIC, the official .pk registry, or a local registrar first.
Step 10: Run a Test Order Before Real Customers Arrive
Shopify's test mode does not cover manual methods such as COD, so place one real COD order for yourself (Shopify Help Center). Do not book a courier for it; cancel it from Orders and restock the items. For card and wallet gateways, use the test or sandbox mode your provider offers, because this depends on the provider rather than Shopify. Shopify suggests an email ending in @example.com for test orders.
Check these on your phone:
- The delivery fee shows correctly at checkout
- The confirmation email arrives and reads well
- The order appears under Orders, and you can mark it as paid
Step 11: Pick Your Plan, Remove the Password, and Go Live
Shopify lets you remove the store password only after you pick a plan. If you pick one during the trial, you are not charged until the trial ends (Shopify Help Center).
- Choose the Basic plan from Settings > Plan.
- Go to Online Store > Preferences.
- Untick: Restrict access to visitors with the password and click Save.
Copy This Launch Checklist
- Store currency set to PKR
- Homepage checked on mobile
- At least five products with photos, prices, and stock
- About, Contact, and FAQ pages published
- Refund, privacy, shipping, and terms policies published
- Pakistan shipping rates saved
- Cash on delivery activated with clear instructions
- Test order placed and cancelled
- Plan chosen and password removed
The First Week: Practical Ways to Win Your First Orders
- Share your store link on WhatsApp with friends and family, and ask for honest feedback.
- Connect the Facebook and Instagram sales channel and post short product videos.
- Reply to every message within an hour; quick answers build COD trust.
- Check analytics daily for visits and the customer add-to-cart actions and orders.
These steps do not guarantee orders, but they put your store in front of real people quickly. To bring in visitors beyond your own network, start with our SEO for beginners guide.
7 Costly Mistakes New Sellers in Pakistan Make
- Shipping COD orders without confirming them first.
- Adding products before setting the store currency to PKR.
- Leaving delivery and return rules vague.
- Paying for a premium theme before the first sale.
- Installing many apps that slow the store down.
- Copying supplier descriptions and photos.
- Skipping the test order.
The first mistake usually costs the most, because a refused COD parcel brings in no money but still costs you delivery, the return trip, and packaging.
Worked Example: Profit on One COD Order
The figures below are illustrative, not real store data. Replace them with your own product cost and your courier's written quote.
Item
Delivered order
Refused parcel
Customer pays (product Rs 3,500 plus delivery Rs 200)
Rs 3,700
Rs 0
Product cost
Rs 1,800
Rs 0 (item comes back)
Packaging
Rs 100
Rs 100
Courier delivery charge
Rs 250
Rs 250
Courier return charge
Rs 0
Rs 250
Result
Profit of Rs 1,550
Loss of Rs 600
Shopify charges no transaction fee on COD orders, so its fee does not appear here. If your courier adds a COD handling fee, include it as well. In this example, one refused parcel wipes out nearly 40 percent of the profit from a delivered order, which is why the confirmation step in Step 8 is worth the effort.
Learn Alone or With a Course? An Honest Comparison
Factor
Learning alone
WeVersity Shopify Store Building course
Cost
Free
Free
Structure
You piece tutorials together.
8 modules from account setup to launch
Practice
Your own trial store
Learner activities and a final store project
Questions
Forums and videos
Course Q&A section
Proof of skill
None
Certificate of completion
Shopify's free Help Center suits confident self-learners. If you prefer a structured path, the free Shopify Store Building course by Mumtaz Kouser teaches Shopify for beginners from account setup to launch and also shows how to offer store building as a freelance service.